
A child's imagination is a fantastic thing! And the tiniest little space can become a great, big magical journey! That's why I was thrilled to team up with several other bloggers for a Fort Building Challenge hosted by Building Blocks and Acorns.

Canopy Fort
Materials
- extra large embroidery hoop
- four sheer curtain panels (We found these at Target.)
- spool of tulle
- hot glue gun or Command Strips
- ribbon
- ceiling hook
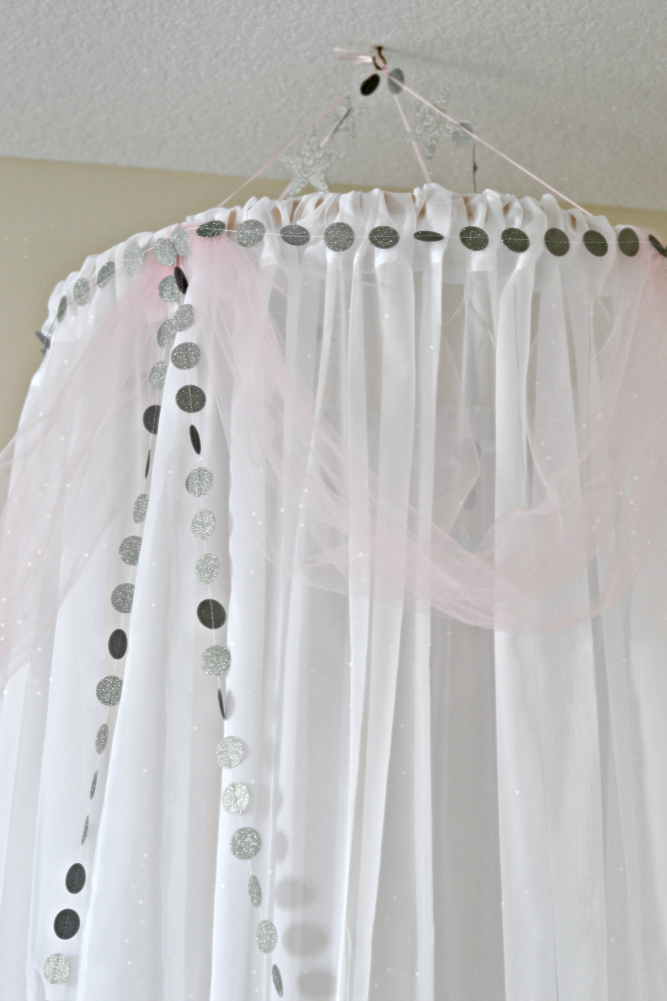
Feed the curtain panels around the outside piece of the embroidery hoop. Tip: While you are doing this step, wrap a small plastic bag around the side of the hoop the curtains are going over to keep them from getting picked and torn. Close the hoop up and spread out the curtains evenly. Tie a piece of ribbon about 18 inches long in between each of the four panels. Gather the strands of ribbon together and tie them into a single knot. This is what your canopy will hang from. To attach tulle, garlands, or other decorations, use a hot glue gun or Command adhesive strips. I used pieces cut from adhesive strips so my embellishments would be removable. Install a wall hook and hang your canopy from the hook.

Sparkly Paper Garlands
Materials
- sparkly paper
- sewing machine
- thread
- paper punch and scissors

Directions
Use a paper punch and sparkly paper to make small cutouts. We punched out circles to decorate the canopy with. I also cut out stars to hang from the inside. Once you have your sparkly cutouts, you can begin feeding them through your sewing machine. If your paper is one-sided, sandwich two pieces together with the right sides facing out so that both sides of the garland will be sparkly. Sewing a paper garland is quick and easy. Just keep feeding pieces through the machine and sewing them together into one long chain. For more details on making a paper garland, you can visit here or here.

Sparkly Pixie Dust
Materials
- glitter
- small piece of paper
- small corked bottles
- hot glue gun

Directions
Twirl a piece of paper into the shape of a funnel. Place the small end of your makeshift funnel into the bottle. Pour glitter pixie dust through the funnel and into the bottle. Replace the cork and apply a small amount of hot glue around the rim to keep it from coming out. Trust me! You'll want to do this last step. I didn't glue the lids on at first, and Lydia Grace decided to remove the corks, sprinkle pixie dust on herself, and attempt to fly. Love her! Glue those lids on or you'll be vacuuming later.

Add your garlands and sprinkle in some pixie dust, fairy wings, blankets, pillows, and fairy reading materials. Let playtime begin!


Now it's your turn! Go build a fort with your little ones! And don't forget to check out all of the inspiring fort ideas on Building Blocks and Acorns!


Happy fort building!


This fort is amazing!! I love seeing all the creative fun forts on the Fort Building Challenge :-)
ReplyDeleteThis is AWESOME Jennifer!!
ReplyDeleteI wish I knew how to sew.....
Beautiful fort--my daughter would LOVE this! Thanks for linking up with us at MeetUp Monday! Hope to see you again this week!
ReplyDelete–Krista
http://www.thequinntessentialmommy.com/
This is the perfect kid place, but gosh...I think I also want to do it in my yoga/meditation area now too haha. Thanks for linking up your posts with us at MeetUp Monday! Hope to see you again this week!
ReplyDelete–Mandy http://www.OddsandEvans.com