The Life of Jennifer Dawn: December 2010

Thursday, December 30, 2010

A Look Back at 2010

Here's a little walk down memory lane featuring some posts from 2010!

My Personal Picks:
My Favorite Kid's Craft:

Proudest Mommy Moment:
 (Click on the link above to view the videos.  WARNING: I was a little excited.)

The Most Magical Day:

Best Family Vacation:

 Funniest Post:
(It's another video.  You'll just have to click and see it for yourself.)

Hardest Trial of 2010:
(I know this isn't one of the happier moments of 2010, but it was one of those times in life when you just know God is carrying you.)

Yummiest Post:

Best of "Makin' House":

Based on reader comments and features here are the Top Ten Most Popular Posts of 2010!
In order of their appearance...

But what are felt cut-outs without a Felt Board


#8: The Ruffle Skirt and its Tutorial

#9: Bookmark Tutorial (Party of the Crafty Christmas Countdown)


2010 has been a terrific year! I am so excited about all that 2011 has in store!


Shopping Trip with a Toddler

Lydia Grace, Mimi, Aunt Allison, and I went out for lunch and a little bit of shopping yesterday.  My shopping list for Hobby Lobby (Don't you just love that store?!) consisted of ...
-fabric
-buttons
&
-thread

Apparently Lydia Grace's consisted of
-ribbon
&
-flowers
I wonder what she wanted to make...
What busy little feet and hands she has!

Wednesday, December 29, 2010

Ruffle Skirts

Here are some new Ruffle Skirts for my Etsy Shop that opened this week.  I haven't made a sale yet, but I am having so much fun sewing and sharing.  Stop by Bluebird Cottage Designs and take a look.  If you would like the tutorial for The Lily Ruffle skirt, click here for my Ruffle Skirt Tutorial link.
I want to keep this pink skirt for Lydia Grace.  I may have to make another one.


Sunday, December 26, 2010

I finally opened an Etsy Shop.

There are only a few items listed right now, but I finally did it!  I opened an Etsy ShopBluebird Cottage Designs is now open for business.


 Here is a question I have already been asked numerous times...

Why did you name your shop Bluebird Cottage Designs?

In case you too are wondering where the name came from, I will explain.  I love to name things--all things including vehicles and appliances.  The car is named Audrey.  My new Roomba--a Christmas present from Tim's mom and step dad--is now called Rosie.  You get the point.  Well, I have also named our house.  We have a modest brick ranch with a lovely view from the back.  The sweetest little bluebirds come to visit at my kitchen window.  That mixed with my love of naming things and...  
Voila!
  The house received the name Bluebird Cottage.  (I'm sure Tim would like for me to mention that he does not call it that.  Just me.)  Since I will be making the things for the Etsy Shop from my home, I thought Bluebird Cottage Designs would be an appropriate name.

Christmas 2010 Snapshots

Here are a few pictures from our Christmas Eve and Christmas this year.

Christmas Eve!
Lydia Grace in her new ruffle skirt that Mimi picked out the fabric for and I sewed.

 She was really wanting to open some presents at Mimi and Papa's house on Christmas Eve.

 Here are a few handmade goodies that I put together and gave as gifts.

Opening a present from Aunt Allison.

Daddy was helping to open this present.

 Riding the train from Mammaw and Pappaw while wearing Daddy's new hat.

Christmas Day!
 Tim and Lydia Grace each bought me two bracelets that are engraved.  The one from Tim says my name and the one from L.G. says, "Mommy, I love you."   I was modeling it for the camera while tearing up because they were such sweet gifts.

Lydia  Grace trying out her new camera from her Great Mammaw and Great Pappaw.

Opening presents from mommy and daddy on Christmas morning.

Getting the table set for Christmas Dinner at our house.

What a special weekend!

Happy Sunday

Saturday, December 25, 2010

Friday, December 24, 2010

Monster Finger Puppet Book Tutorial

It's Day 24 of...
It's the final day of this crafty Christmas Countdown.  I hope you have enjoyed seeing the Twelve Crafts and have gained some crafty inspiration.  The projects you have seen on this 24-day series prove that you do not need a lot of resources or money to make wonderful gifts for those you love.  All of the crafts used the same red felt and red polka dot fabric.  By the way...I still have a ton left.  Maybe I will have to put it up and save it for next's year's crafty countdown.  

Tomorrow is Christmas Day and I won't be crafting or sewing.  I will be spending a relaxing, lovely day with my family--opening presents, drinking hot cider, cooking Christmas dinner, and laughing together.   Today Tim, Lydia Grace, and I will be traveling around to visit with our families.  I hope your Christmas Eve and Christmas Day are filled with lovely memories surrounded by the ones you love.

Okay...back to the business at hand.  Here's the tutorial for the Felt Book with Monster Finger Puppets that I showed you on yesterday's post.

Supplies:
*Felt scraps (various colors)
*Sewing machine
*Velcro
*Basic sewing supplies (thread, pins, scissors...)
* Hot glue gun
*Fabric glue
*Craft blue that can hold beads or googly eyes
*Googly eyes
*Paper scraps and pencil
 *One sheet of computer paper (8 1/2 in. by 11 in.)

Directions:
1. Draw and cut out a template that looks like the one shown below.  Use the template to cut out two layers of felt.

2. Using a 1/4 in. seam allowance, sew around the felt leaving the bottom end open.

3. Once you are done sewing the pieces together, use your pinking shears to cut around the seam.  You can turn the finger puppets inside out or leave them with the zig zag cut showing.

4. Use felt scraps and googly eyes to decorate your finger puppet monsters.  (Tip: A hole punch can be used to make small circles of felt.  You could also use buttons, pom poms, or other small items to decorate your monsters.)  I used a craft glue to adhere the googly eyes and a fabric glue to adhere the felt pieces.

5. Use your piece of computer paper to cut out a piece of felt measuring the same size.

6. Fold the piece of felt in half like a hamburger and use the pinking shears to cut around all of the edges except the folded side.  Use pins to hold it in place.  Using a 1/4 in. seam allowance, sew a seam right along the folded side of the felt.  This creates your book.

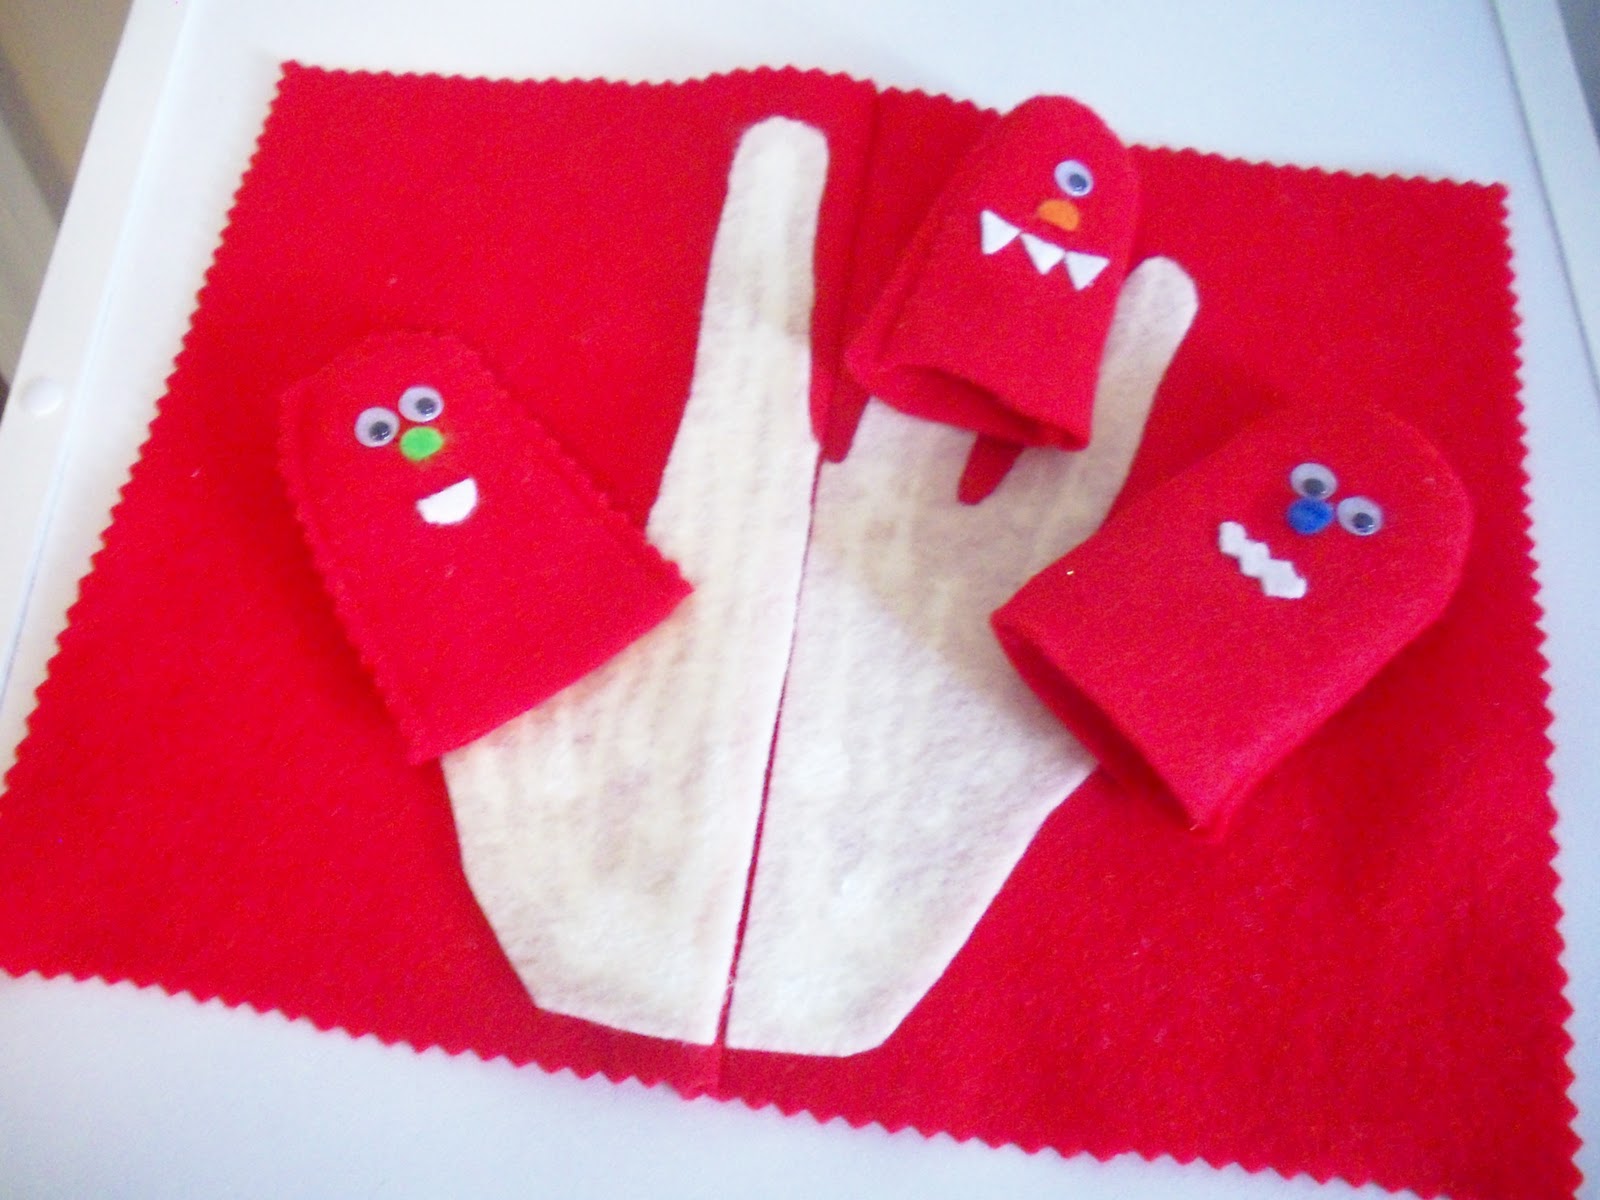
 7. Since these are finger puppets, I thought it would be cute to have a felt hand holding onto the puppets inside the book.  Trace your hand on a piece of paper, cut it out, and use it as a template to cut out a felt hand.

 8. In order to allow the book to still close nicely, you need to cut your hand in half and adhere each piece to the inside of the book using fabric glue.  As you can see from the pictures, I matched up the cut edges of the hand to the inside spine of the book and glued them down.  It looks a little streaky in the pictures right now, but it dries well. 

9. With a hot glue gun, adhere one side of a velcro piece to a finger and the other side to one of the felt puppets.  This will secure them to the inside of the book until little fingers are ready to play with them.

 10. Decorate the outside of the book to match your finger puppets.

 Place it into a little pair of hands and watch imaginations come to life.

Subscribe